接着eclipse 使用maven 创建web3.1项目
创建完成后, 讲spring mvc加入到项目中
先修改pom.xml文件
  1
  2
  3
  4
  5
  6
  7
  8
  9
 10
 11
 12
 13
 14
 15
 16
 17
 18
 19
 20
 21
 22
 23
 24
 25
 26
 27
 28
 29
 30
 31
 32
 33
 34
 35
 36
 37
 38
 39
 40
 41
 42
 43
 44
 45
 46
 47
 48
 49
 50
 51
 52
 53
 54
 55
 56
 57
 58
 59
 60
 61
 62
 63
 64
 65
 66
 67
 68
 69
 70
 71
 72
 73
 74
 75
 76
 77
 78
 79
 80
 81
 82
 83
 84
 85
 86
 87
 88
 89
 90
 91
 92
 93
 94
 95
 96
 97
 98
 99
100
101
102
103
104
105
106
107
108
109
110
111
112
113
114
115
116
117
118
119
120
121
122
123
124
125
126
127
128
129
130
131
132
133
134
135
136
137
138
139
140
141
|
<project xmlns="http://maven.apache.org/POM/4.0.0" xmlns:xsi="http://www.w3.org/2001/XMLSchema-instance"
xsi:schemaLocation="http://maven.apache.org/POM/4.0.0 http://maven.apache.org/maven-v4_0_0.xsd">
<modelVersion>4.0.0</modelVersion>
<groupId>com.learn.javaee</groupId>
<artifactId>createspringmvc</artifactId>
<packaging>war</packaging>
<version>0.0.1-SNAPSHOT</version>
<name>createspringmvc Maven Webapp</name>
<url>http://maven.apache.org</url>
<properties>
<spring.version>4.3.2.RELEASE</spring.version>
</properties>
<dependencies>
<dependency>
<groupId>junit</groupId>
<artifactId>junit</artifactId>
<version>3.8.1</version>
<scope>test</scope>
</dependency>
<!-- servlet api -->
<dependency>
<groupId>javax.servlet.jsp</groupId>
<artifactId>jsp-api</artifactId>
<version>2.2</version>
<scope>provided</scope>
</dependency>
<dependency>
<groupId>javax.servlet</groupId>
<artifactId>servlet-api</artifactId>
<version>2.5</version>
</dependency>
<!-- Spring -->
<dependency>
<groupId>org.springframework</groupId>
<artifactId>spring-core</artifactId>
<version>${spring.version}</version>
</dependency>
<dependency>
<groupId>org.springframework</groupId>
<artifactId>spring-context</artifactId>
<version>${spring.version}</version>
</dependency>
<dependency>
<groupId>org.springframework</groupId>
<artifactId>spring-beans</artifactId>
<version>${spring.version}</version>
</dependency>
<dependency>
<groupId>org.springframework</groupId>
<artifactId>spring-aop</artifactId>
<version>${spring.version}</version>
</dependency>
<dependency>
<groupId>org.springframework</groupId>
<artifactId>spring-jdbc</artifactId>
<version>${spring.version}</version>
</dependency>
<dependency>
<groupId>org.springframework</groupId>
<artifactId>spring-web</artifactId>
<version>${spring.version}</version>
</dependency>
<dependency>
<groupId>org.springframework</groupId>
<artifactId>spring-webmvc</artifactId>
<version>${spring.version}</version>
</dependency>
<dependency>
<groupId>org.springframework</groupId>
<artifactId>spring-tx</artifactId>
<version>${spring.version}</version>
</dependency>
<dependency>
<groupId>org.springframework</groupId>
<artifactId>spring-context-support</artifactId>
<version>${spring.version}</version>
</dependency>
<dependency>
<groupId>org.springframework</groupId>
<artifactId>spring-orm</artifactId>
<version>${spring.version}</version>
</dependency>
<dependency>
<groupId>org.springframework</groupId>
<artifactId>spring-test</artifactId>
<version>${spring.version}</version>
</dependency>
<dependency>
<groupId>org.springframework</groupId>
<artifactId>spring-websocket</artifactId>
<version>${spring.version}</version>
</dependency>
<!-- Spring -->
</dependencies>
<build>
<finalName>createspringmvc</finalName>
</build>
</project>
``
然后编辑web.xml文件
如果安装过STS插件的话, 直接按alt + 回车
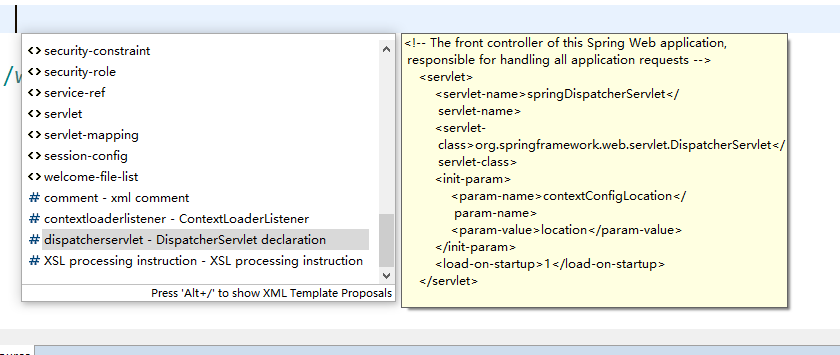
选择后就出来了, 然后改成如下
```xml
<?xml version="1.0" encoding="UTF-8"?>
<web-app
xmlns:xsi="http://www.w3.org/2001/XMLSchema-instance"
xmlns="http://xmlns.jcp.org/xml/ns/javaee"
xsi:schemaLocation="http://xmlns.jcp.org/xml/ns/javaee http://xmlns.jcp.org/xml/ns/javaee/web-app_3_1.xsd"
id="WebApp_ID"
version="3.1">
<!-- The front controller of this Spring Web application, responsible for handling all application requests -->
<servlet>
<servlet-name>springDispatcherServlet</servlet-name>
<servlet-class>org.springframework.web.servlet.DispatcherServlet</servlet-class>
<init-param>
<param-name>contextConfigLocation</param-name>
<param-value>classpath:applicationcontext.xml</param-value>
</init-param>
<load-on-startup>1</load-on-startup>
</servlet>
<!-- Map all requests to the DispatcherServlet for handling -->
<servlet-mapping>
<servlet-name>springDispatcherServlet</servlet-name>
<url-pattern>/</url-pattern>
</servlet-mapping>
</web-app>
|
classpath:applicationcontext.xml 文件名可以修改, 无所谓
按照如图位置创建applicationcontext.xml文件
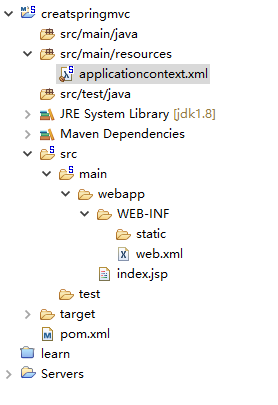
文件内容如下
 1
 2
 3
 4
 5
 6
 7
 8
 9
10
11
12
13
14
15
16
17
18
19
20
21
22
23
24
25
26
27
28
29
30
|
<?xml version="1.0" encoding="UTF-8"?>
<beans xmlns="http://www.springframework.org/schema/beans"
    xmlns:xsi="http://www.w3.org/2001/XMLSchema-instance" xmlns:context="http://www.springframework.org/schema/context"
    xmlns:mvc="http://www.springframework.org/schema/mvc"
    xsi:schemaLocation="http://www.springframework.org/schema/beans http://www.springframework.org/schema/beans/spring-beans.xsd
        http://www.springframework.org/schema/context http://www.springframework.org/schema/context/spring-context.xsd
        http://www.springframework.org/schema/mvc http://www.springframework.org/schema/mvc/spring-mvc.xsd">

    <!-- 设置自动扫描的包 -->
    <context:component-scan base-package="cn.learn.*"></context:component-scan>
                                             要在src/main/java 下创建包为cn.learn, 为了方便就这么写了, 大神别喷我
    <!-- 开启自动注解支持 -->
    <mvc:annotation-driven />
    <!-- 定义静态资源位置 -->
    <mvc:resources location="/WEB-INF/static/" mapping="/static/**"></mvc:resources>

    <!-- jsp视图处理 start -->
    <bean
        class="org.springframework.web.servlet.view.InternalResourceViewResolver">
        <!-- 视图前缀 -->
        <property name="prefix" value="/WEB-INF/view/"></property>
        <!-- 视图后缀 -->
        <property name="suffix" value=".jsp"></property>
        <property name="viewClass"
            value="org.springframework.web.servlet.view.InternalResourceView" />
        <property name="order" value="1" />
    </bean>
    <!-- jsp视图处理 end -->

</beans>
|
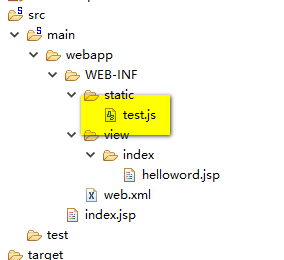
然后变成这样的目录结构
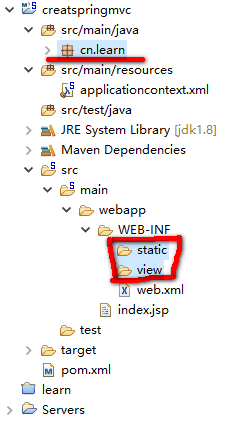
在cn.learn包下新建一个controller包(这一步不是必须的, 但是一般都要分开, 这东西看项目)
然后在controller包下新建一个类 IndexController
 1
 2
 3
 4
 5
 6
 7
 8
 9
10
11
12
13
14
15
16
17
|
package cn.learn.controller;

import org.springframework.stereotype.Controller;
import org.springframework.web.bind.annotation.RequestMapping;
import org.springframework.web.servlet.ModelAndView;

@Controller
@RequestMapping("/index")
public class IndexController {

    @RequestMapping("/helloword")
    public ModelAndView hellowordAction(){

        //直接返回到view目录下的 index目录下的helloword.jsp
        return new ModelAndView("index/helloword");
    }
}
|
新建文件 在 view/index/helloword.jsp
 1
 2
 3
 4
 5
 6
 7
 8
 9
10
11
12
|
<%@ page language="java" contentType="text/html; charset=ISO-8859-1"
    pageEncoding="ISO-8859-1"%>
<!DOCTYPE html PUBLIC "-//W3C//DTD HTML 4.01 Transitional//EN" "http://www.w3.org/TR/html4/loose.dtd">
<html>
<head>
<meta http-equiv="Content-Type" content="text/html; charset=ISO-8859-1">
<title>helloword</title>
</head>
<body>
this is a helloword page
</body>
</html>
|
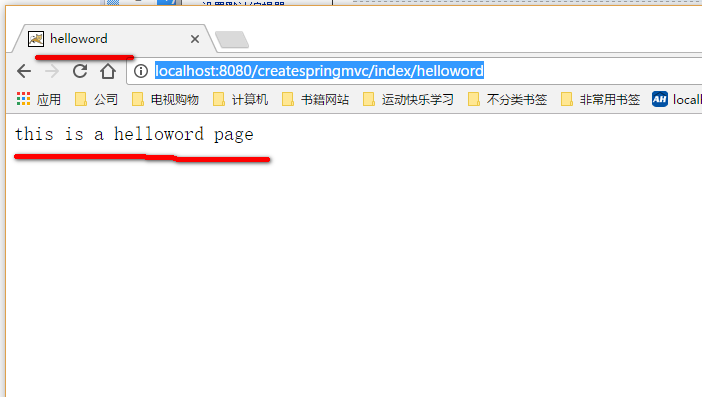
启动tomcat浏览器访问
http://localhost:8080/createspringmvc/index/helloword
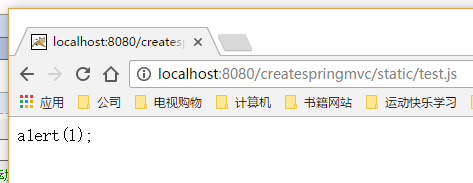
应该注意到在applicationcontext.xml文件中配置过一个静态文件访问
<mvc:resources location=”/WEB-INF/static/” mapping=”/static/**“></mvc:resources>
把web应用的所有 类似于js css images 等, 不需要走框架的都放到这里
例如
写了一行 alert(1);
在浏览器中访问http://localhost:8080/createspringmvc/static/test.js
如果把这个js在页面中引用的话
在helloword.jsp页面引用
再次访问http://localhost:8080/createspringmvc/index/helloword
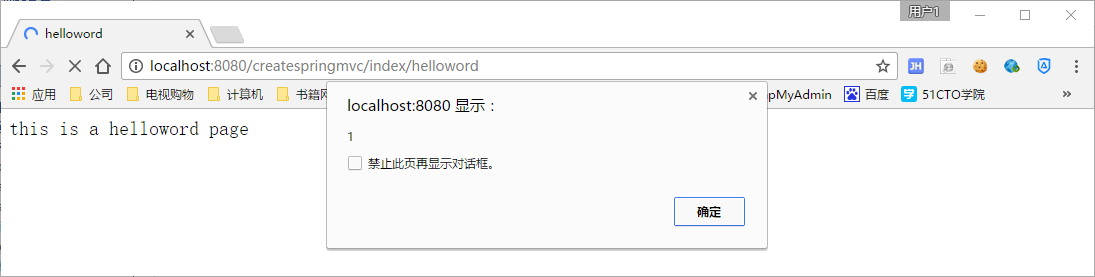
这样就完成springmvc的最基本的可以访问了